Cycling helmets are essential for safety, but over time, the pads inside can wear out, leaving you with an uncomfortable ride. Replacing your cycling helmet pads is an easy and effective way to improve comfort, maintain hygiene, and extend the life of your helmet. In this guide, we'll walk you through how to replace cycling helmet pads, ensuring you get the most out of your helmet.

Why Replace Your Cycling Helmet Pads?
Helmet pads do a lot more than just cushion your head. Replacing them when they start to wear out can make your rides more comfortable and help maintain your helmet's protective qualities. Here are the main reasons you should replace your cycling helmet pads.
Improve Comfort and Fit
Over time, helmet pads lose their shape and cushioning. When this happens, they no longer provide the snug fit and comfort you need. Replacing them with fresh pads gives your helmet a new lease on life, ensuring you feel comfortable during every ride.
Maintain Helmet Hygiene
Your helmet pads are exposed to sweat, dirt, and oils from your skin, and over time, they can start to smell or even cause irritation. Replacing your helmet pads helps keep everything fresh and clean, ensuring you won’t have to deal with unpleasant odors or buildup.
Extend the Life of Your Helmet
Replacing the pads in your helmet isn’t just about comfort—it also helps preserve the overall structure of the helmet. Well-maintained pads prevent the helmet from wearing down prematurely, allowing it to last much longer and continue offering optimal protection.
How to Replace Cycling Helmet Pads
The process of replacing cycling helmet pads is simple and doesn’t require much expertise. Here’s how to do it step by step.
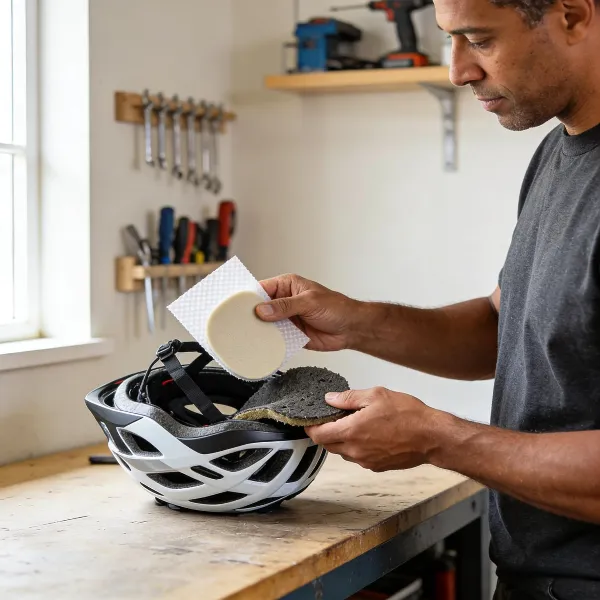
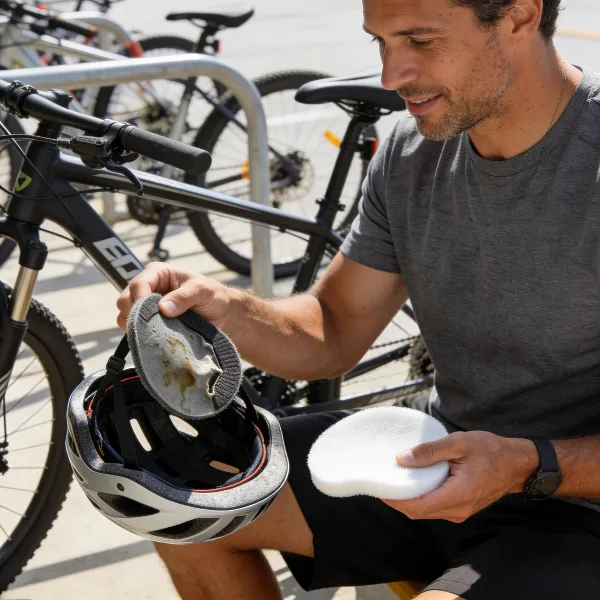
Remove the Old Pads
Start by carefully removing the old pads from your helmet. Some helmets use Velcro, while others rely on adhesive or snaps to secure the pads in place. Gently peel or detach the pads without damaging the interior of the helmet. Make sure to remove all of the old padding so you can clean the interior thoroughly.
Clean the Helmet Interior
Once the pads are out, it’s a good idea to clean the inside of your helmet. Use mild soap and water or a specialized helmet cleaner to wipe down the interior. This ensures you remove any dirt, sweat, or oils left behind by the old pads. Let the helmet dry completely before moving on to the next step.
Check Velcro or Adhesive Condition
If your helmet pads were attached with Velcro or adhesive, check these areas to see if they’re still in good condition. Worn Velcro or weak adhesive can cause the new pads to shift or come loose. If necessary, replace the Velcro or reapply fresh adhesive before putting in the new pads.
Align and Attach New Pads
Take your new pads and carefully align them with the interior of the helmet. Position them in the correct areas for optimal comfort and fit. Once you're happy with the placement, press the pads firmly into place, whether using Velcro, adhesive, or snaps. Ensure they’re secure and evenly spaced to avoid discomfort while wearing the helmet.
Ensure Proper Fit
After the new pads are in place, try on the helmet to make sure it fits well. The new pads should feel snug but not tight, providing comfortable cushioning without causing pressure points. If the fit isn’t quite right, adjust the pads until you get the perfect fit.
Let the Adhesive Dry
If you used adhesive to secure the pads, allow the adhesive to dry completely according to the manufacturer's instructions. This is crucial for ensuring the pads stay in place during your rides. Don’t rush this step—waiting for the adhesive to dry will ensure a secure fit that lasts.
Tips for Successful Helmet Pad Replacement
To make your pad replacement even smoother, here are a few tips to keep in mind.
Choose the Right Pads
Be sure to choose the right replacement pads for your helmet model. Many helmet brands offer specific pads designed for their helmets, which will provide a better fit and more comfort than universal options. Look for pads made from breathable, moisture-wicking materials that will keep you cool during your ride.
Handle Worn Velcro Tabs Carefully
If your helmet’s Velcro tabs are worn, replace them with care. Over time, Velcro can lose its grip, which may cause the pads to shift or even fall out. When replacing or adjusting Velcro, make sure it’s aligned correctly and pressed down firmly to secure the pads in place.
Common Mistakes to Avoid
Replacing your helmet pads is a simple task, but it’s easy to make a few common mistakes. Here’s how to avoid them.
Not Cleaning Properly
One of the most common mistakes is neglecting to clean the inside of the helmet before replacing the pads. Sweat, dirt, and oils from your skin can build up over time, and if you don’t clean the helmet thoroughly, you might leave debris behind that can affect the new pads. Clean the interior thoroughly to ensure a fresh, clean surface for the new pads.
Applying New Pads Too Quickly
Another mistake is rushing the process and applying the new pads before the adhesive has fully dried or before you’ve properly aligned the pads. This can cause the pads to shift or not stick properly. Take your time, allow the adhesive to set, and make sure the pads are perfectly positioned before you finish the installation.
Conclusion
Replacing your cycling helmet pads is a quick and simple way to improve your comfort, hygiene, and the overall life of your helmet. It ensures that your helmet continues to protect you and keeps you feeling comfortable during every ride. By following these easy steps, you’ll be able to replace your pads and enjoy a better fit in no time. Don’t forget to choose the right pads, clean your helmet properly, and take your time with the installation.